Hello my dear readers.
I have been scrapbooking for now nearly 4 years but only two months ago I managed to attend to a crop for the first time ever. The class was designed by Annamarie from TheScrapbookstore.ie and the details are here. I must admit I really enjoyed a social aspect of the crop. We used Salt Air collection, papers buttons and chip stickers by Cosmo Cricket, lovely papers and other items.
Then, despite all enjoyment and excitement it took me nearly 2 months to complete those two simple pages, had to make some adjustments to the original design so that fits with my photos. These are the pages that I end up with:
Then I've got inspired and made two more pages from the leftovers:
Both of these pages are based on sketches, first one is from the Page Maps (I think) and the second one is based on the scrap-a-little sketch, it seems I cannot make an original page anymore (LOL), but there is something in those two pages that is not usual me: I've got loose with mists and stamps and I must admit I am happy with the results.
I am going tomorrow night again on the same crop, I am looking forward to it and hope this time I will be quicker with finishing pages.
All have a nice time till next post and thank you for reading my blog and any comments.
Svjetlana xx
Wednesday, May 25, 2011
Tuesday, May 17, 2011
Thank You Helen
Hi everybody,
I cannot believe I am posting today again, but there is a reason; I was just trilled to see that Helen from the Scrap-A-Little become my follower. Thank you so much Helen, I adore your sketches, flowers and your pages of course and would recommend everybody to visit your blog.
And now I would like to share two pages I made using Helen's sketches:
It looks like the white balance on the page two is not right, the background should be snow white. Anyway all flowers on these pages are hand made by me, again something I learnt on Helen's blog that a page can look stunning without spending a fortune on embellishments.
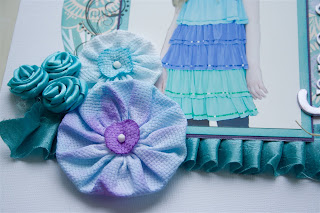
I used satin ribbon to make roses, there are lots of tutorials about these on YouTube, and white embroidery fabric and inks to do Yo-yo flower on the page 2. The yo-yo flowers were inspired by two my daughter has on her dress, not very visible on the photo.
The butterflies on the page one are QuitzKutz die and Marta Stuart punch and bling swirl is again 'home' made using hot fix gems by Imaginesca. And there are few close-ups:
These yo-yo flowers are very simple to make and any fabric could be used, if anybody is interested in tutorial, let me know and I will post one here.
Thanks again, see you soon,
Svjetlana x
Monday, May 16, 2011
A Couple of Thank You Cards
Hello everybody
First of all I would like to say 'Big Thank You' to everybody who commented my last post or emailed me regarding my job problems. Your moral support really means me a lot, and my story is turning from bad into worse at the moment, but at least I am meeting a solicitor this week, so will get a proper advice.
I would also like to say 'Thank You' to everybody who visits my blog and what is better way to say thank you but 'Thank You' cards.
This is all for tonight, I hope you like them.
Hope to write soon again
Svjetlana xx
First of all I would like to say 'Big Thank You' to everybody who commented my last post or emailed me regarding my job problems. Your moral support really means me a lot, and my story is turning from bad into worse at the moment, but at least I am meeting a solicitor this week, so will get a proper advice.
I would also like to say 'Thank You' to everybody who visits my blog and what is better way to say thank you but 'Thank You' cards.
I made these cards for our lovely childminder and her assistant as the kids had to be taken out of the daycare due to my job situation. The cards were inspired by one I have seen once on some blog. Please forgive me for forgetting which one and if anybody recognises them I would appreciate if you tell me where my inspiration came from. These cards helped me to find my mojo again.
The roses are my own make, used X-cut and EK Success punches and K&Co papers to do them, stamps are some old Basic Grey and Tim Holtz dies were used for the borders, of course lots of inks and plain cards. I hope you like them, there are few close-ups too:
Hope to write soon again
Svjetlana xx
Wednesday, May 4, 2011
Raffia Flower Tutorial
Hello
I hope somebody still visits my blog.
I am not going to write much details about my private life on this blog, but there is something I have to share because it does affect my crafting a lot; I have been having problems with my employer for several months now (working but not being paid) and finally have been laid-off from my job a week ago. That puts lots of pressure and put me a bit down and off crafting, but I am coming back to it slowly.
Now back to the tutorial. This flower is inspired by most recent releases by Prima. I figured out two ways of making them, one way is very fiddly, and I just could not manage to do it and take photos at the same time, might do video once, but I am not that brave at the moment. So I will show you my second option:
You will need:
- Raffia
- A pair of scissors
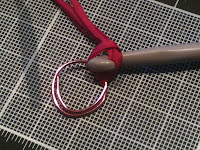
- Bigger jump ring or some ring made of wire
- Glue gun,
- Paper circle, and some flower centre
- Optional: Crochet hook and mist and/or paint
- Cut raffia into pieces at least 2.5 times longer then you want diameter of your flower to be. I'd say, about 30 of these is needed.
- Fold each piece of raffia into half and crochet (hm mm.. is that a right word, I am not sure, but I thing the photos show what I mean) it onto your ring. keep doing this until the flower is dense as desired.
- Then take some template circle and trim the flower to the desired size and shape. Glue gun paper circle on the back side and chosen flower centre on the front of the flower.
And this is all for now. I hope this will be useful.
Be back later
Svjetlana xx
Back to Crafting
Hello
I haven't been blogging or crafting for nearly months now, at this stage I can only say that I had good reason for that I am coming back into it slowly these days. I would like to share with you now one layout I did long time ago. It was for the Pencil Lines design team search. In some way it is good I did not get into the team considering how little time I had for crafting over the last two months.
Anyway, this is Anna's sketch provided for the team search:
and this is my page I made:
and few close-ups:
The papers and dragonfly stickers are from the Basic Grey paper pack and flowers are made by me. Chipboard title is made using using Sizzix dies covered with card and coated with modge podge.
I will hopefully be working on some tutorial soon to keep this blog interesting and useful.
Cheers
Svjetlana xx
Subscribe to:
Comments (Atom)


